Fly Fishing with Doug Macnair: Of Leaders, Tippets and Knots: Part 3©
Fly Fishing with Doug Macnair: Of Leaders, Tippets and Knots: Part 3©
From his manuscript, Fly Fishing for the Rest of Us
A few More Words About Leaders: As a carry over from last week’s discussion, there remain one or two points to mention in relation to tippets and leaders. Generally speaking, the lighter the tippet, the longer it can be reasonably be -- as long as it delivers the fly. However, as the tippet gets longer, lighter and finer, it correspondingly becomes weaker. Thus, you are apt to see it settle to the water in curves or puddles. Is this bad? Of course not, depending on what you are trying to do. If you are fishing a creek, stream or river, "puddling" your leader downstream may be the very thing that brings a strike. In fact, a few weeks down the road, when we get into advanced casting techniques, the puddle cast is one of the alternatives that provides a drag-free drift. (If you allow the fly line to drag your fly, catching a fish will only happen in your dreams.)
In the presentation of the fly -- particularly in fresh water -- the fact that the fly lands in a wavy pattern or a slight curve is never bad, if it produces fish! Normally a gentle presentation is by far preferable to the "plop" of line, leader and fly hitting the water. It is somewhat difficult for a fish to believe that plop is very lifelike. Plopping line, leader and fly on the water is about as bad as throwing your fly directly at the fish. It scares hell out of a fish when attacked by a little-bitsy fly; most likely, it would scare the hell out of you, too. The point is this: select a tippet that’s too heavy, too light, too long and/or too short and you are likely to find yourself fish-less.
Sometimes folks want to know if there is any way to compensate for a super long leader when chasing shy fish. Sure there is! Lefty Kreh, one of the fly fishing greats, has long advocated going to a "light" fly line to enable a shorter leader. Had I known this years ago, perhaps the golden trout of that beaver pond in the Rockies might not have eluded me. Using a technique called tip casting, a heavier weighted rod can cast a line far below its rating. Said another way, a 6-weight rod can tip cast a 2 to 3-weight a "practical" distance to catch fish. Based on your review of "All About Lines," it should be easy to understand that the thinner "light" fly lines hit the water softly in comparison to their heavy brethren. Statistics indicate that most fish are taken within 30-feet of the fly caster. Tip casting will be discussed later in this series during the discussion of fly casting techniques, so stay tuned.
 The Loop-To-Loop Connection: Now that you know all about lines, leaders and tippets, the issue becomes the best way to join the lot together. There is only one practical way -- knots between the reel spool and backing; knots between the backing and fly line; knots between the fly line and leader; and knots between the tippet and fly line. And of course, if you decide to make your own leaders, lots more knots. Thanks to the knot-tiers, this is the reason many potentially great fly fishers lose interest: They just are not into knots. Frankly, I don’t blame them. I only wish they understood there isn’t a requirement to learn the 1,684 knots the knot-tiers love to tie.
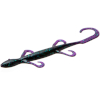
 The best way to make any of the system connections, except perhaps for the tippet to fly, is by the use of loop-to-loop connections. So just how do you do that? It’s easy! This is what the loop-to-loop connection looks like. When the loops are properly intertwined, the loops form a square knot as the two lines pull against each other shoulder to shoulder. Loops, as they are depicted here, can be formed several ways. I love loops. Loop-to-loop connections make it easy to switch back-and-forth between this and that in fly fishing components. Without them, switching out a line or a leader can be a tedious task. Loop-to-loop connections are also strong, a very important point. There are those fly fishers who will sing the praises of the famed "nail knot." I don’t happen to be one of them. The nail knot is fine for the leader to line connections on little 2, 3 or 4-weight system, but little else other than marking a point on a fly line for the roll cast. I do not like the nail knot in any of its several forms. (One nice thing about writing the fly fishing column is the ability to "truthspeak." That’s another way of saying, "Tell it like it is.") The nail knot is a failure unless you go through a very elaborate process I’ll not bore you with. If you are into knots, use the nail knot on big 8" trout, perch and other fighting minnows.
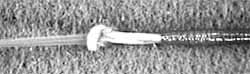
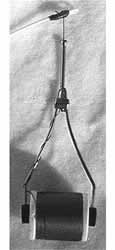
 Now listen closely -- other than the backing loop to the fly lines, use small loops. Large loops will inhibit the transition of power, and that, as you now know, is not good. I make my fly line loops using a fly tying bobbin to "spin" a strong thread or light mono over and around the folded ends of the fly line. The centrifugal force of spinning the thread makes for a very strong connection. Before spinning, however, angle cut the fly line’s end so the junction is smooth when the line is folded over against itself. Secure the whip finish with the "thread under wraps pull" (as in replacing a rod guide) or with a series of half-hitches, followed by a dab of waterproof super-glue and Permabond. When completed, your fly line loops should look somewhat like this. Be sure to check the wraps occasionally during and after each outing. Of course, this applies to any junction regardless of whether you use loops or knots. Re-coat or retie the loop if required.
Initially, spinning the loop might seem awkward, but if you give it a chance, it will become easy and fast. If you decide spinning the loop is not for you, I suggest trying the braided loops available from Cortland and Orvis. I know many folks who swear by them and, if properly installed, reliable. If you elect to go this route, be sure you obtain a braided loop kit that is sized for your fly line.
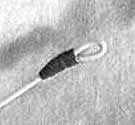
The Knots. As I promised at the outset, allow me to make a complex subject very very simple: You are required to learn only one knot, and it is very simple to tie. It is called the Uni-Knot or Duncan’s Loop. The uni-knot does everything very well, provided it’s tied correctly. It can be used as (1) the connection of backing to the reel spool, (2) the connection of the backing to the fly line, (3) the connection of the leader to the fly line and (4) the connection of the tippet to the fly. Just think -- one knot that does all of the above. Actually, it does even more! Tying the basic uni-knot is simple: for example, as depicted here, the line (tippet) has been passed through the eye of the hook, and a loop formed in the tag end. The line is then wrapped around the doubled line inside the loop four to five times. Now comes the important part, depending on your preference. The knot can either be cinched down tight and drawn up (as it might be against the eye of a hook) or cinched down, but left in a loop (perfect for free-working flies).
When working with light materials such as a tippet to fly connection, I ordinarily leave the uni-knot as the Duncan’s loop. Besides enabling the fly to swim, the loop is a shock absorber when a fish strikes. While it takes no more than a micro-second before the knot slips and draws tight against the fly, that micro-second softens the strike. Important? It could be, if you are after a record on a light "class" tippet. Need to snell a hook? There is no better way than by passing the line through the hook’s eye and tying a uni-knot along the shank. It is hard to believe, but true, one knot does all this!

Duncan Loop
With heavier material, such as leader butts, the Duncan’s loop can be used as just that, a loop -- a loop well suited as a loop-to-loop connection for the leader butt to fly line. Amazing? Not really! This is simply a very versatile knot. With heavy materials, the loop will retain it shape when tightened down. Want to tie your own leaders? Great! Just use the uni-knots, back-to-back, to join together each segment of the leader materials. Cinch down and you will have a very strong union -- much stronger than you could ever expect from the "blood knot." The fact is there is no knot better than the uni-knot to join two pieces of mono together. Need a double line? You might, particularly when tying a "class" tippet to a shock (bite) tippet. Simply take a long piece of the class tippet, double it over onto itself and proceed to tie a Duncan’s loop. It’s almost as strong as the world acclaimed Bimini twist.
Are there any problems with the uni-knot? You bet! Most of them are you and me. It reminds me of the old saw, "When a knot is not a knot, it’s not!" From time-to-time many of us fail to properly tie our knots. And when the knot fails who do we blame? Why -- the knot, of course. It is always the knot’s fault. So it is that the uni-knot is subject to the same vagaries as is any knot tied by an idiot.
So how do you tie a knot? Tie a knot very slowly and with great care. Follow the rules and you will have success; fail to follow the rules and don’t blame the knot when it fails. Here are the rules:
- Use a length of material that is sufficient for the task -- usually about 8-inches. Tying a knot with a length too short is a waste of monofilament and almost guaranteed to waste the knot.
- Form the knot slowly with large loops that do not twist the line (unless twisting is called for as in the Bimini).
- Lubricate the line thoroughly using saliva or water before beginning to draw the knot tight.
Make certain you draw the knot together by pulling on proper end -- tag, line or both ends -- as directed.
- Tighten the knot very slowly, carefully observing that it comes together correctly.
Cinch the knot tight and trim the tag end as directed.
Caution: Many knots require the use of pliers and gloves when using heavy materials, such as 40 to 80-pound test mono. The uni-knot is not an exception.
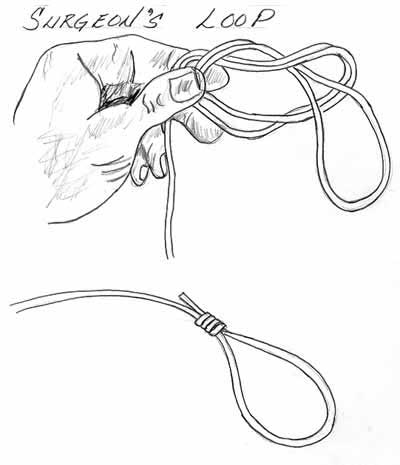
The Surgeon’s Loop. The surgeon’s loop is important because it works very well, provided you observe the "how to tie" rule just mentioned. Simple to tie, the surgeon’s loop is nothing more than a doubled line tied into two overhand knots as shown. One of its best applications for this knot is forming the large loop in the backing for looping to the fly line. Why the large loop? Simple -- so the reel and or lines can easily pass through when switching out.
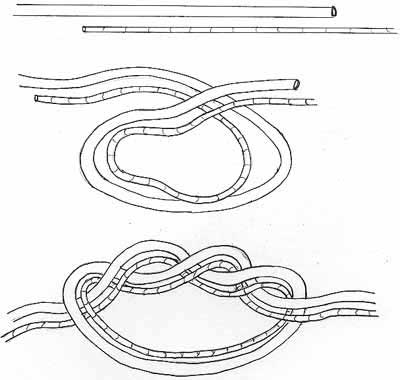
Double Surgeon's Knot
The Surgeon’s Knot. The surgeon’s knot is the blood brother of the loop by the same name. In fact, it is tied the same way -- through a double overhand knot. The surgeon’s knot does a fine job of joining two lines of unequal size together. When making your own leaders, it is an excellent way to join the segments of differing sizes of monofilament together. For this purpose, it is almost as good as the uni-knot. Follow the knot tying guidelines, an the surgeons knot is extremely reliable. What more can I say?
So there it is -- everything you need to know about tying knots for fly fishing. There is, of course, more to learn should you get into knots. If you fish the salt, I would recommend adding the Albright and Huffnagle. And when the day comes when you feel like acting like a monkey, try the Bimini twist. The Bimini is a very good knot to know.
Resources. To learn more about the uni-knot, write for Vic Dunaway’s Complete Book of Baits, Rigs, and Tackle, Wickstrom Publishers, Inc., 5901 SW 74th Street, Miami, Florida 33143. If you don’t happen to be into collecting the books of the fly-tiers, this is what you can do to find out more about knots. Call or fax Ande, one of the great names in monofilament, and ask for their Book of Knots. It’s free! Telephone (561) 842-2474 or fax (561) 848-5538. Stren also offers a very neat booklet on knots entitled, Choosing & Using Line & Knots, the charge, if any, may depend on whether or not you are a Stren user. Then, too, Orvis offers a couple of knot booklets, one for freshwater and the other for the salt. Considering both are printed on waterproof paper, the cost for is very reasonable.
Next up: It is a dramatic change of pace! We begin the discussion of "All About Rods." I think you will enjoy the series. Importantly, I hope you’ve enjoyed, and learned a bit during this discussion "Of Tippets, Leaders and Knots." If you have, it is my pleasure! Now my thought for the week: "When a fly is not like a Green Frog, it might be a Leech -- and a Leech neither flies nor hops." God Bless.
© Copyright: Douglas G. Macnair, 1997.
|